For: CRMDAY One users with the Insurance profile.
Images show actual system screens in a local environment with fictitious data. Captures represent different moments in Nina Torres’s and Maria Costa’s examples.
Separate organization, responsibility and search
| Feature | Purpose |
|---|---|
| Labels | Identify interests or groups, such as ACA enquiry and Follow-up scheduled. |
| Owner | Identifies responsibility for the record and appears in the Audit trail. |
| Client Manager | Identifies who follows the client and appears in Contact and address. |
| Filters | Select which records appear in the list. Filtering does not change contact details. |
A label does not grant access or replace a responsible user. Applying Follow-up scheduled does not create a task: record the next action separately when needed.
1. Apply labels consistently
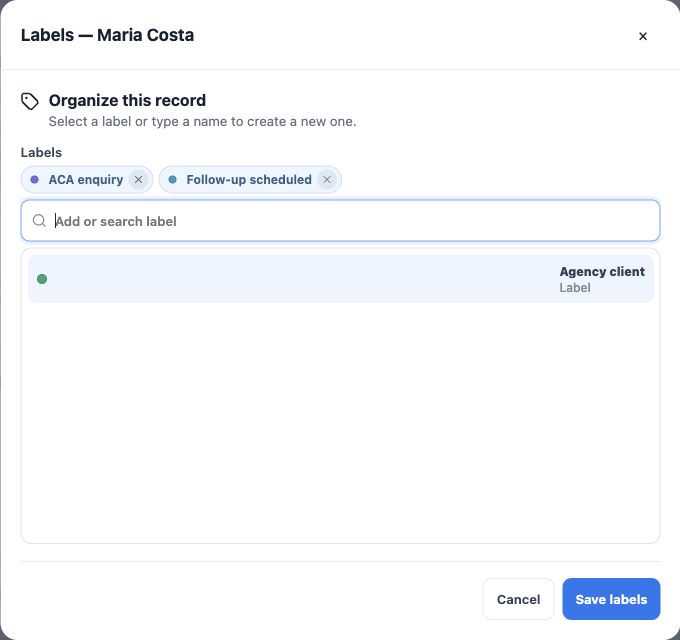
- Open the record and use the label icon, identified as Edit labels.
- Find and select an existing label. Maria has ACA enquiry and Follow-up scheduled in this example.
- Avoid creating variations with the same meaning. If a new label is needed, check agency conventions and use the picker’s creation option.
- Click Save labels and verify the header. To remove an association, remove the selection and save again.
Removing a label from a record is different from deleting it from the agency’s catalog.
2. Check who follows the contact
At the end of the record, the Audit trail shows Owner. In Contact and address, check Client Manager. Alex Morgan may hold both roles, as in the example, or they may be different users.
To change responsibility, use the available picker and confirm saving. For Client Manager, activate Edit data, select the user and save the field. Owner changes depend on available actions and permissions in the Audit trail. If you cannot change it, ask the agency’s administrator.
Changing a responsible user does not replace organizing agreed tasks and follow-ups. Check related records to preserve continuity.
3. Build a filter for today’s work
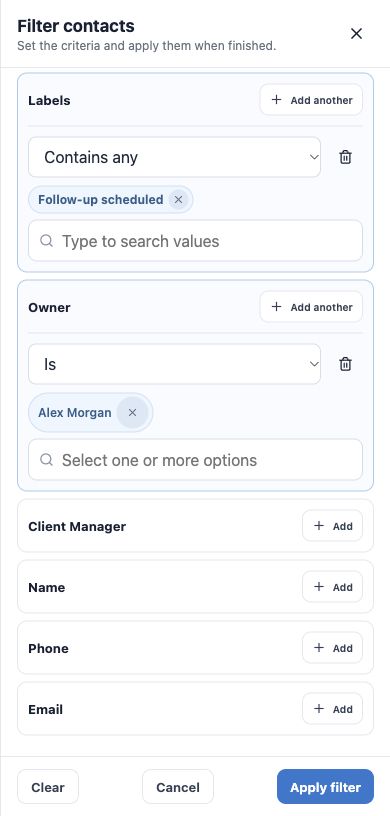
- Return to Contacts and open Filters.
- Find Labels in the catalog and add a condition. Use field search to locate other available information.
- Choose Contains any and select Follow-up scheduled.
- Add an Owner condition, choose Is and select Alex Morgan.
- Keep all criteria under the matching setting to require both the label and that Owner.
- Click Apply filter. Closing or canceling without applying does not confirm changes to conditions.
With any criteria, matching one condition is enough, so the result may be broader. Available operators depend on field type.
4. Check results and return to the record
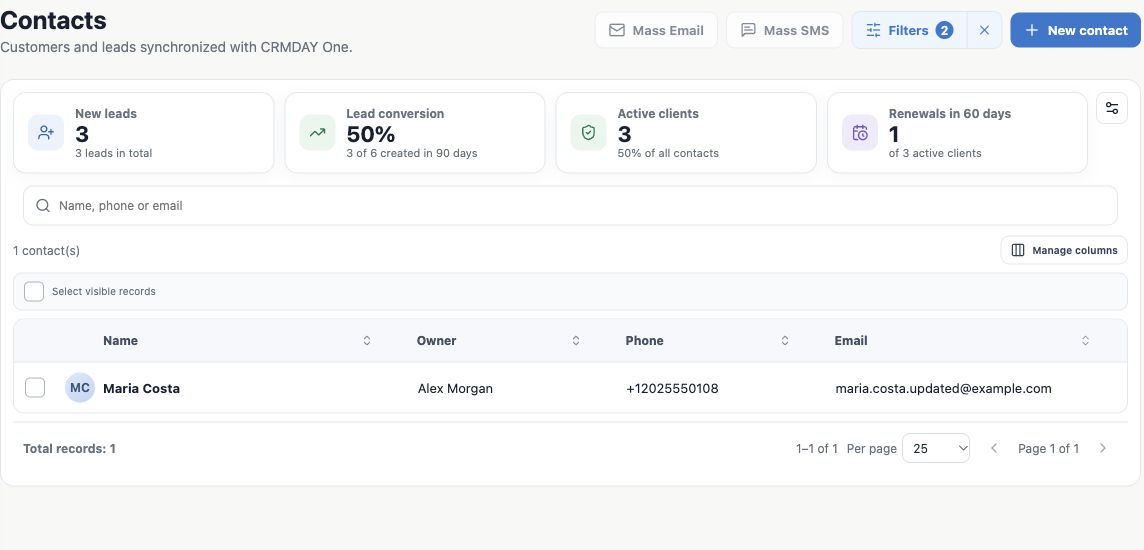
The example’s combined filter returns one Maria Costa. Check the total, row details and responsible user before opening the name. Use pagination for larger result sets.
Search, filters and columns are separate controls
- Quick search: name, phone or email text continues to restrict the list together with filters. Use Clear search to remove that text.
- Active filters: use Clear filters beside Filters to remove applied conditions. Clearing inside the drawer requires applying the new state.
- Manage columns: selects the information displayed in the table; it does not change which records match.
- Saved filters: when available, let you store a selection for reuse. Check conditions and context before applying it again.
If nobody appears, check search text, conditions, agency and access. Do not create a new contact just because a filter hid the existing one.
How to confirm success
Labels are consistent, responsible users have been checked and you can open a follow-up list matching the day’s work. To understand each client’s next step, return to the contact record and client 360 view.
Keep learning
- Find a contact before creating a new one
- Create a new contact
- Understand the contact record and client 360 view
- Edit and maintain contact details
Updated October 24, 2026.