For: CRMDAY One users with the Insurance profile.
Images show actual system screens in a local environment with fictitious data. Captures represent different moments in Nina Torres’s and Maria Costa’s examples.
Before creating a contact
Check the selected agency and use the search explained in the previous chapter. A lead received through a form, Conversations or an import may already exist. If you find the person, continue from their existing record.
Our example creates Nina Torres, with email nina.torres@example.com and fictitious phone number +1 202 555 0119.
1. Open New contact and enter the essentials
- Open Contacts → New contact.
- Enter a contact name your team can recognize.
- Enter the email and phone confirmed by the person. Check the country and international code; do not use an incomplete number.
- Review Owner and Client Manager. If either is empty or incorrect, search for and select the responsible user. Typing a name into a picker does not replace selecting the option.
The name is required. Responsible users also need to be selected; other required fields may depend on your agency’s configuration. Do not invent information to move past a required field.
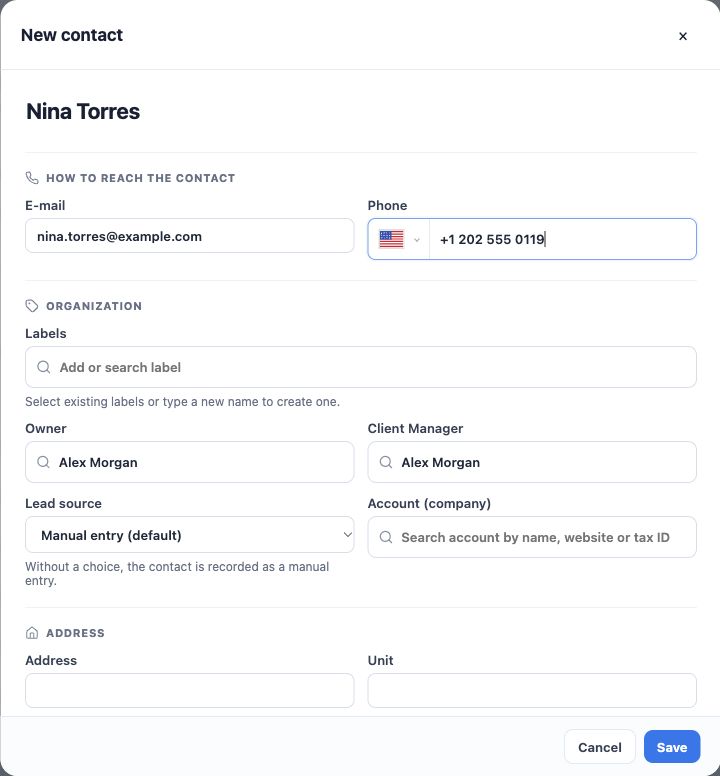
2. Complete organization details and address
| Field | How to use it |
|---|---|
| Labels | Reuse existing labels for interests or follow-ups. Organize and filter your contact database explains how to use them. |
| Owner and Client Manager | Owner identifies responsibility for the record; Client Manager identifies the person following the client. They may be the same user or different users. Follow your agency’s working arrangement. |
| Lead source | Without another selection, manual creation uses Manual entry. Select the source that matches the case. |
| Account (company) | Link a company when relevant to the relationship. This is a CRM account, separate from the agency selected for your workspace. |
| Address and additional fields | Enter confirmed information. If you select an address suggestion, check city, state, ZIP and unit. Additional sections vary by configuration. |
You do not need to fill every possible field to learn the process. Start with correct information required by the agency and complete other details when confirmed.
3. Save and verify the record
- Review name, email, phone and responsible users.
- Click Save and wait for the result. Correct any validation issue shown.
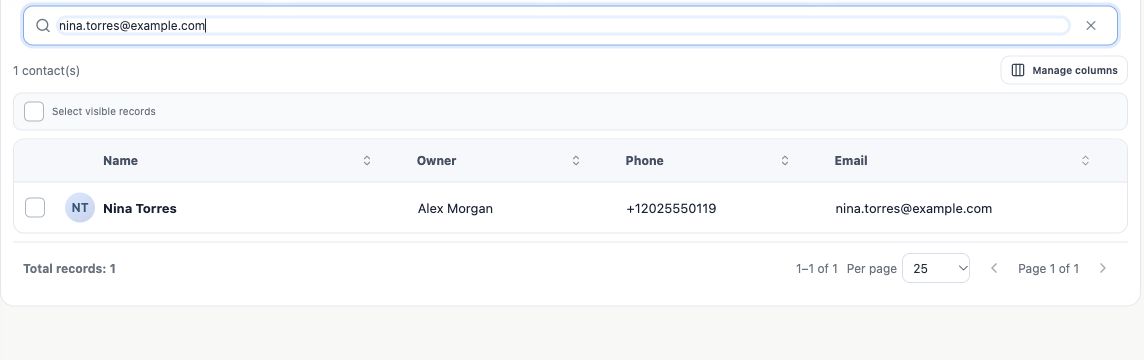
- Check the name on the opened record. Return to Contacts and search for the email or phone you entered.
- Open the result and verify the saved details. Use this same record for future conversations, tasks and opportunities.
If saving reports a conflict or failure
- Phone already associated: check the indicated contact before trying another record. Confirm identity and shared-number use; do not change the number just to bypass the warning.
- Required field or responsible user: select a valid option and review the requested information.
- Uncertain result: if the operation took too long or some details did not save, search again before repeating creation. The contact may exist even if a supplementary step failed.
- Action unavailable: ask the agency’s administrator to check your access.
How to confirm success
Nina appears in search with the entered phone and email, responsible users are correct and you can reopen the same record. Next, learn how to read the record and client 360 view.
Keep learning
- Find a contact before creating a new one
- Understand the contact record and client 360 view
- Edit and maintain contact details
- Organize and filter your contact database
Updated October 24, 2026.