For Insurance agency Owners and administrators.
Guides in this chapter
- Register and organize sending domains
- Authenticate the domain with DNS records
- Configure senders and authorized users
- Configure the campaign footer and unsubscribe link
- Validate setup and monitor sending
Open the setup workspace
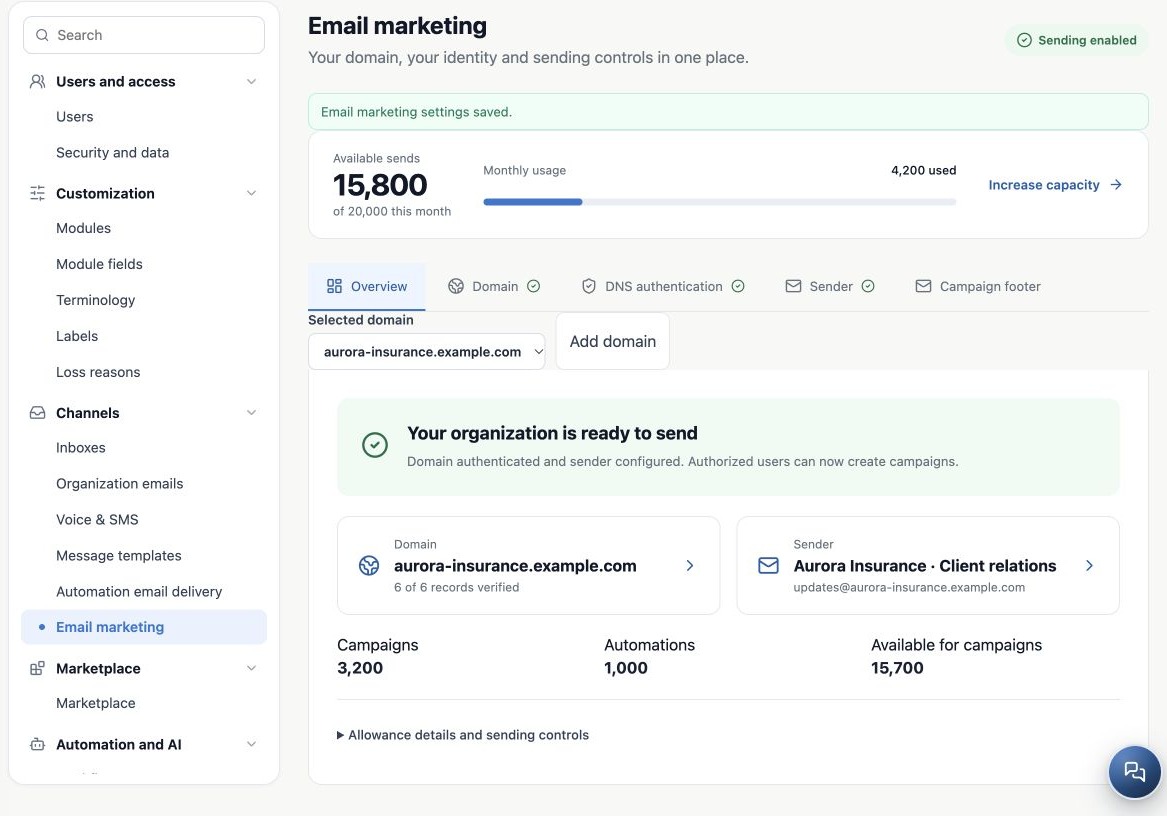
As an Owner or administrator, open Administration → Settings → Channels → Email marketing. Check the active agency. This workspace prepares sending with your business domain: Domain, DNS authentication, Sender, Campaign footer and Overview.
Example: Aurora Insurance wants to send renewal guidance to clients who authorized that contact. Before selecting recipients, it must authenticate the domain, set its sending identity and review unsubscribe behavior. This chapter covers that preparation; creating a configuration does not send a campaign.
Choose the sending method deliberately
| Feature | Purpose |
|---|---|
| Email marketing | Campaigns through the platform delivery service, with authenticated domain, authorized senders, allowance and automatic unsubscribe footer. |
| Organization mailbox | Correspondence through a connected account; it may be offered for operational bulk sending. Its account permissions and limits apply. |
| Personal account | Individual correspondence according to user access; it does not replace a campaign sender. |
When bulk sending offers a method choice, verify the selected method. This chapter applies to Email marketing. A dedicated sender is not an inbox and requires no SMTP password. Reply-to points to an existing mailbox but does not configure its receiving connection.
Gather prerequisites
- An agency-owned domain and authorization to use it.
- DNS manager access or a person responsible for publishing records.
- A sender name and address clients will recognize.
- An existing mailbox monitored for replies.
- Users authorized to use each sender.
- A footer identifying the agency with a visible unsubscribe link.
If platform sending is not enabled, consult the account owner or support. Domain preparation may be available before enablement; it does not authorize sending. Agency administrators do not need AWS credentials or changes to the platform’s global integration.
Follow the sequence to final confirmation
- Register the domain and check its complete name.
- Publish and verify that domain’s unique DNS records.
- Configure sender, reply-to and authorized users.
- Review and save the campaign footer.
- Return to Overview, check readiness and allowance, then run an authorized test send.
The example’s Sending enabled and 6 of 6 records verified are simulated states for teaching. In a real agency, published DNS alone is insufficient: delivery-service confirmation, active account, eligible sender, no pause and available allowance also matter. Authentication identifies the sender; it does not guarantee primary-inbox placement.
Related guides
- Register and organize sending domains
- Authenticate the domain with DNS records
- Configure senders and authorized users
- Configure the campaign footer and unsubscribe link
- Validate setup and monitor sending
- Administrator manual
Updated October 25, 2026.