For: CRMDAY One users with the Insurance profile.
Images are actual system captures in a local environment, with fictitious details, plans, prices and benefits for educational purposes. Examples are not commercial offers. Screens are localized for this language; fields and availability may vary by agency and year.
1. Build the comparison selection
- Check that the query uses the correct details and year.
- Check Compare on at least two plan cards. You may select up to three.
- Review names and the selected count in the comparison bar. At the limit, uncheck a card before adding a replacement.
- Click Compare in the bar to open the table.
Compare and Select are different. Comparison collects alternatives; Select highlights one option. Neither action in the contact’s quote flow completes enrollment.
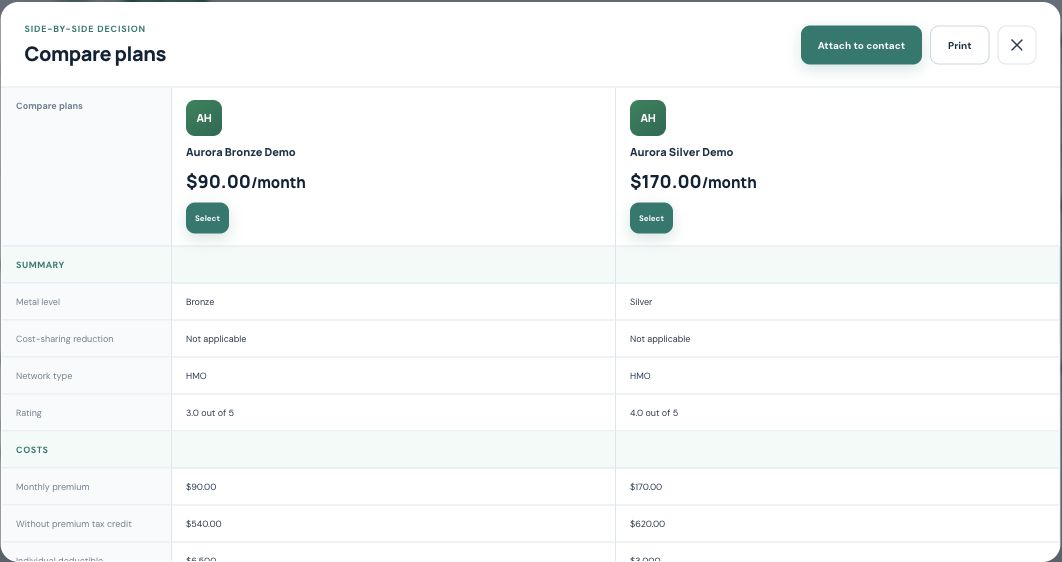
2. Read rows as well as headings
In the example, Aurora Bronze Demo has a $90 premium and $6,500 deductible; Aurora Silver Demo has a $170 premium and $3,000 deductible. These fictitious amounts illustrate that a lower premium does not mean lower costs in every scenario.
- Check each column’s complete plan name and insurer.
- Compare premiums with and without credit, deductible, out-of-pocket maximum and network.
- Read benefit rows with conditions such as “after deductible” intact.
- Review cost-sharing reduction when shown and available characteristics. Do not replace missing or Not applicable values with assumptions.
3. Match the options to confirmed needs
Use the table to discuss relevant differences: doctors, medications, network, benefits and costs. If information is absent, consult plan details and documents; the table is a summary.
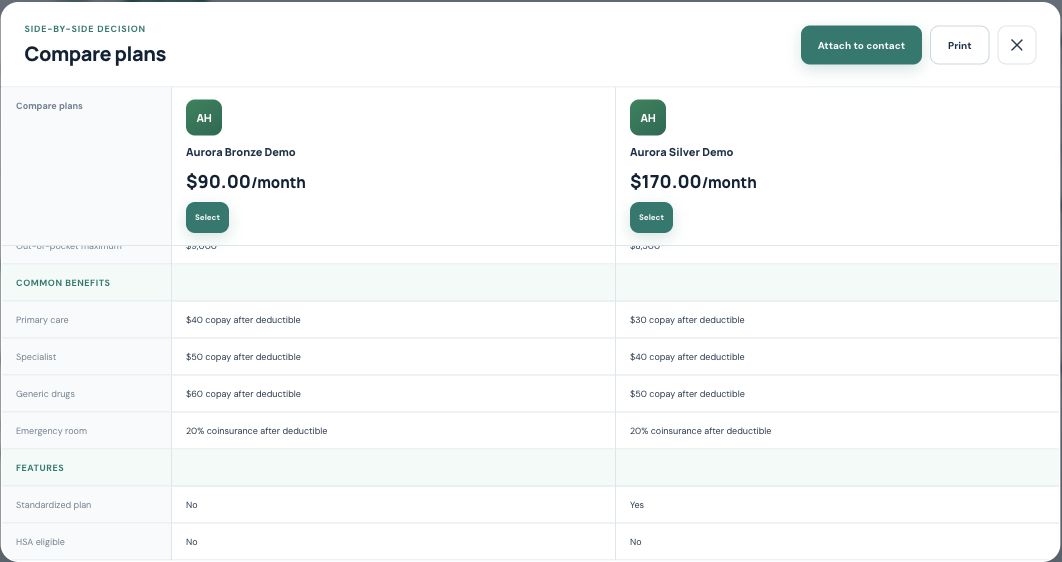
The image shows copayments with an “after deductible” condition. Keeping that condition in your explanation avoids presenting an isolated amount as if it applied in every situation.
Print, Select and Attach serve different purposes
| Action | Result |
|---|---|
| Opens browser printing. This does not save the simulation in the contact record. | |
| Select | Highlights a plan for further review. In the contact flow, it does not automatically create a Policy. |
| Attach to contact | Generates the comparison material and saves it to the contact using the next topic’s procedure. |
Inside the new-Policy Wizard, the flow differs: continuing returns the selected plan to the Wizard to complete the Policy being created. Do not expect the three-plan comparison in that mode. Policy creation still requires review and completion in the Wizard.
When to rebuild the comparison
If income, location, year or household composition changes, retrieve plans again and rebuild the selection. Do not reuse an old PDF as if it reflected changed information. Check the final options before generating the material.
You are done when names, year and main differences are clear and the selection matches what you intend to present. Continue with Save and share the simulation with the client.
Keep learning
- Open an ACA quote from the contact
- Check household details and retrieve plans
- Review and filter available plans
- Save and share the simulation with the client
- Find and organize your clients
Updated October 24, 2026.